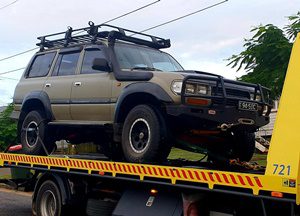
THOSE who follow our Flexible 4WD Solutions Facebook page will likely be aware we recently bought a new project in the form of an 80 Series Toyota LandCruiser.
Back in November we saw an ad on Facebook for a tough-looking 80 Series that needed some work. Now when we saw this ad, we were already thinking about selling our Patrol (the Milk Carton) to make way for a dedicated bush rig and a fun daily driver, so this immediately sparked my interest. A tough-looking 80 advertised at an affordable price of course led to a high level of competition and interest. This 80 Series appealed to us on a number of levels.
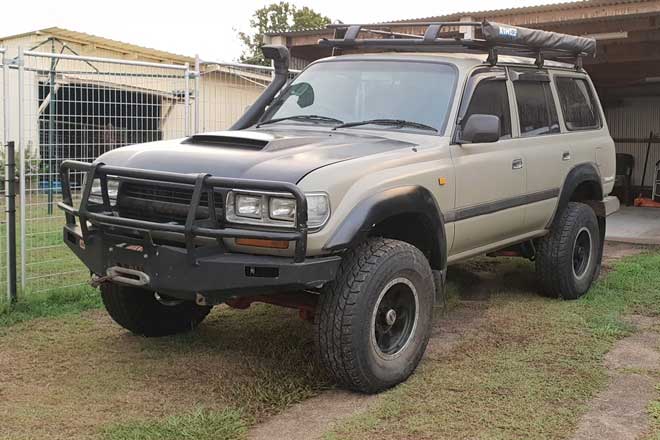
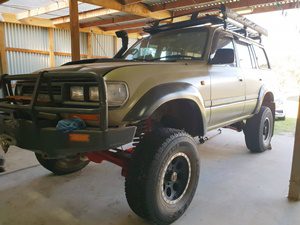
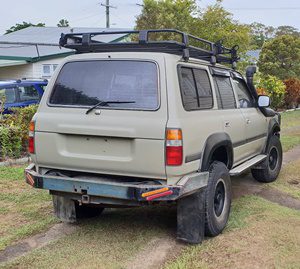
First, the price. At under $8000, it would allow us enough money leftover for the build. Next, the practicality. The 4.2-litre diesel motor is well known for its durability and ‘never die’ reputation, which has the added bonus of sitting on solid axles with coils all around. But most of all, the look. With its fresh custom paint job, huge lift, aftermarket bonnet scoop and large turbo, this rig certainly turns heads. We immediately knew this 80 would be the perfect project for Flexible 4WD Solutions to take on and build into a fourby that met all our needs. The only issue was it was in pieces!
After looking over some photos and seeing a walk-through video of the 80 Series, we quickly became concerned by how much work it would take to simply get it on the road. But given the cracking price, we made the decision to head out to see the car with cash in hand and an expectation that this project would need to be completed over several months.
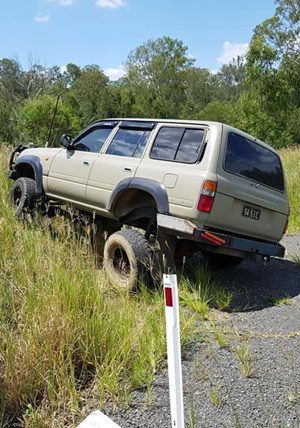
Typically, the day we went out to see the car was the day it rained the most in weeks. Nothing like viewing a car during a storm! The rain was so hectic that I was soaked and literally lying in flowing water as I checked under the car. We spent about an hour crawling all over this rig checking it out. It sat so tall that I was literally climbing up to get into the car and could crawl under it on all fours without even hitting the drivetrain. From here it became evident our original guess of the level of work required to get the 80 back on the road was fairly accurate.
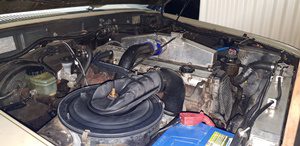
Our inspection revealed a rear main seal leak, gearbox brackets missing, an interior in pieces, valve shims knocking and a complete rat’s nest of wiring. We started having second thoughts but after an hour of hard contemplation and conversation regarding the costs involved in rebuilding, we finally decided to take the plunge and buy it. Then the fun really began as it was time to load the car in the torrential rain. We certainly underestimated the number of spare parts that came with it because we managed to completely fill the wagon as well as put parts on the roof and floor of the tow vehicle.
Even then we had to get the seller to deliver a few remaining parts we couldn’t squeeze in. As soon as we got home the 80 Series started getting attention, with our neighbours coming round to check out our latest buy. That night, we started creating the to-do list and separated it into three sections: things needed to get it on the road, extras (or wish list) and electrical. At this stage we felt overwhelmed and unsure about our decision to take on this project.
First things first, the starter motor on the 80 was completely rooted. Initially we were adamant we wanted to learn how to rebuild the starter as it’s something we had never done before. But after about a week of research and pricing parts, we decided to simply buy a new one and be done with it so we could at least easily move the car when we needed to work on it. It’s safe to say I can now remove the starter motor in less than three minutes.
Now we could start and stop the car whenever we needed and turned our focus to other issues. The first and probably most devastating find was the completely destroyed gearbox. We had been told the second and third gear synchros were a ‘tad crunchy’, but as we had limited space to test drive the car (as it was unregistered) and no ability to engage 4L due to a missing shifter, we had no idea of the extent of the damage. We later discovered it was impossible to shift into either second or third gear while moving.
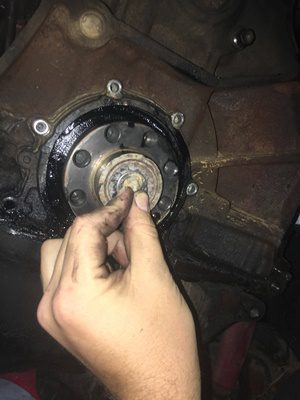
We quickly began the search for a second-hand box and were advised to purchase a H151 gearbox to replace the original H150 box due to it being stronger. This was no issue as we managed to source a box easily and were able to make a bundled deal including a fresh clutch, hub-to-hub front axle and perfect rear LSD. What we did not realise at the time was we needed a 1HDT flywheel to accommodate the gearbox swap, which was nearly impossible to find at a half-decent price.
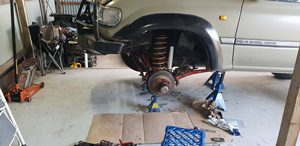
We searched everywhere before getting in contact with NPC Performance Clutches who quickly came to the rescue. We ended up with a new billet flywheel, 1FZ throwout bearing and a few other bits and pieces thrown together to make this box work. Pulling out the gearbox was barely an issue with our mates lending a hand. From start to finish it was out in under an hour.
Next we were onto the clutch of the old 80 Series. When removing the spigot bearing we were unable to get any traction with the range of bearing pullers we had on hand, so out came the bread! For those who haven’t experienced this before, spigot bearings support the input shaft of the gearbox and are pressed into a housing, which in our case was blocking the bearing pullers. An old mechanic’s trick for removing spigot bearings is to fill the centre of the bearing with bread, soap or something else that can be compressed, then use a punch that fills the diameter of the hole and make the item compress and force itself behind the spigot bearing, pushing the bearing out of its housing. We have never used this trick before, however we were pleasantly surprised with how easily it worked.
Next thing we knew the drivetrain was back together and we were able to move forward with the build! With a build list ranging from installing a shifter knob to replacing the entire gearbox, this project has thrown challenges at us left, right and centre. I neglected to mention the reason this car was in pieces when we bought it. It was due to the previous owner half completing a body swap with a full respray inside and out.
We have spent countless hours over the past four months piecing together this puzzle, spending many late nights clipping together plastics and researching parts. There’s been 12-hour days of swinging spanners, grinding and racing to parts shops to grab the last-minute pieces we failed to remember to buy the day before. To date our goal has been to get the 80 on the road (hopefully by Easter) and to accomplish this in a reasonable time frame without (completely) breaking the bank.
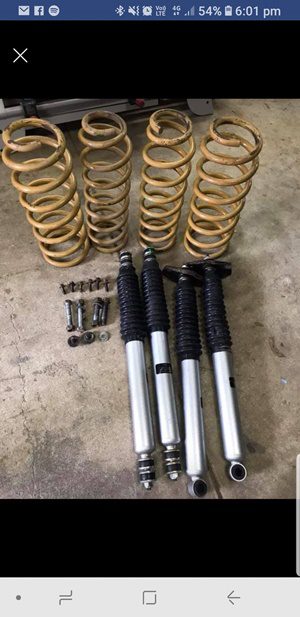
We have managed to source a range of second-hand parts including a 2” (legal) lift to replace the ridiculous 5.5” lift that made climbing into the car nearly impossible. We also sourced a set of 16” Mickey Thompson Baja Lock rims that sit with a -20 offset and are wrapped in a set of 285/75R16 Yokohama Geolander ATS tyres, which sit perfectly in line with the flares – just how we like it.
Our future plans for this rig are to set up the suspension properly, running Dobinsons coils and remote reservoir shocks, replacing all the bar work with custom gear and setting up a quality 12V system. The goal is to transform the 80 Series into a highly capable, custom, head-turning rig without exceeding legal boundaries. But before we get there, we need to get it running properly and test it out on the tracks.
Make sure to head to our Facebook page to stay up to date on the build and our upcoming adventures.
Easter is around the corner! And with Easter comes our annual trip to Levuka 4×4 Park situated just south of the Queensland/NSW border. This is an awesome park for off-roading enthusiasts and simply the best place to head for the Easter break. The park hosts a range of family friendly activities over the long weekend and we definitely recommend jumping onto the Levuka 4×4 Park Facebook page to check out the event details.
Lastly, we are still looking to name our new 80 Series… if you have any ideas or suggestions please feel free to flick them through to us and if you’re onto a winner we will send some stickers your way!
Until next time guys, this is Greg from Flexible 4WD Solutions. 80 series 80 series